

Now that it is a new year, I want to start some better habits to fill my free time other than watching TV or endlessly scrolling on my phone. I have always loved art and creating, so what better thing to do than crafting? It is calming, relaxing, fun, unique and can take anywhere from a couple of minutes to several hours. I tried three simple crafts and want to teach you the step-by-step process so you can do them too.
Altoid wallet
1. Empty and clean the Altoid box.
2. Gather the materials you want to decorate the tin with.
3. Trace the tin along the paper you would like to use to line the top and bottom of the tin.
4. Cut out paper and glue it down.
5. Decide where to place the stickers, ribbon, gems, charms, shells, pearls, etc.
6. Now glue down your selected decorations to secure them in place.
7. The final step would be to fill it with items like lip gloss, small perfume, nail clipper, spare change and whatever other essentials you may need.

Clay banana split
1. Pick out what colors of baking clay you want to use.
2. Take the color you are using for the bowl and shape it to your liking, using your fingers or clay tools.
3. Create two little bananas out of the yellow clay and place them on each edge of the bowl.
4. Make three balls the same size, one pink, one brown and one white.
5. Place the balls in whatever order you want in between the banana slices.
6. Create three small white balls that are the same size and place them on top of each of the ice cream flavors in the bowl. These represent whipped cream.
7. Then, using a clay tool, make three to four slanted indents around the little white balls.
8. Now use the red clay to create three even smaller balls to represent cherries and place them on top of the small white balls.
9. Finally, bake it in the oven for 10-12 minutes with the oven at 210 degrees Fahrenheit.

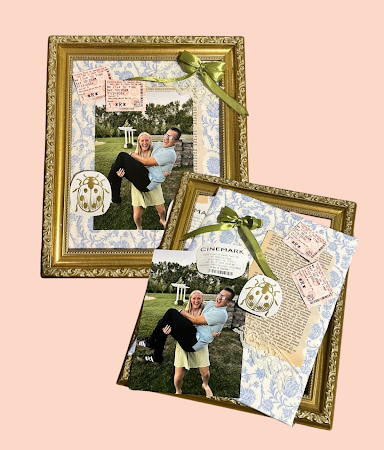
Memory picture frame
1. Thrift or buy a frame.
2. Print a picture you want in the frame.
3. Gather the materials you want to put around your photo.
4. Take the back off of the frame; measure and cut your fabric so it can fold over the edges.
5. Glue the fabric on and wrap the ends to the back of the frame.
6. Decide where you want to place your photo and the other items.
7. Once you have your layout locked in, start to glue everything down.
8. Finally, put the backing in the frame.
Have fun trying these crafts in your free time, and remember to be creative, let loose and let the crafty juices flow.